At Air France-KLM, we love the Angular CLI. We have been using it since its beginnings for all our Angular applications. With the v6 release, the Angular CLI has become more generic, more powerful, and more extensible. It introduced many great features like workspaces, libraries, schematics, and architects. It changed Angular developers' lives–at least mine–for the better by solving many of the challenges we had before the v6 release.
In this article, I will show you what we're doing with the Angular CLI at Air France-KLM, and how the Angular CLI is helping us build better Angular applications.
First let's talk about the context.
Context
I work for a cross-team called TECC-SE (Tools, Expertise, Coaching Center - Software Engineering) that supports all developers within Air France-KLM. I am part of the Frontend subteam whose mission is to help developers build better Angular applications.
TECC-SE's mission is critical for Air France-KLM. We're the only team within our company that works for all Air France-KLM projects. Being part of such a team allows us to work with many developers. But, on the other hand, we need to live up to their expectations by providing support, guidelines, and the right tools for the right job.
Here are some of the challenges we were facing before.
Libraries
I was set out to port some existing AngularJS libraries that many projects were using to Angular.
Problems
When building Angular libraries, your packages must follow the Angular Package Format. You have to generate different kinds of JavaScript modules/bundles (FESM2015, FESM5, and UMD), generate TypeScript definitions, and guarantee that your library is AOT compatible. This was a manual process and very hard to accomplish. I had to learn Rollup (a JavaScript module bundler), go through a good number of Github issues to find relevant information on how to proceed.
After weeks of struggle, I discovered ng-packagr, an awesome tool that transpiles your library to the Angular Package Format. It wasn't mature but it helped us achieve our goal of creating libraries— with less pain. Thank you Mr. David Herges. Then, we used the famous developer technique called Copy & Paste to replicate the process and create many other Angular libraries, each in their own repositories.
Solutions
With the release of v6, the Angular CLI team announced library support, and guess what? It uses ng-packagr under the hood. You can now very easily generate and build libraries with the Angular CLI.
# Generate a library
ng generate library make-it-awesome

# Build it
ng build make-it-awesome

# And publish it to NPM
cd dist/make-it-awesome
npm publish
Workspaces
Before Angular CLI v6, we had all our libraries and their corresponding demo applications in separate repositories.
Problems
This led to some issues:
- Lack of visibility: There was no single entry point for our toolkit, and this made it for developers who wanted to contribute very hard.
- Version inconsistency: We always kept our peer-dependencies versions consistent across our libraries. But we did it in a very manual and repetitive process. Also, we wanted a unified version of our libraries to make it easy for the consumer to know with versions worked together. With our libraries spread across multiple repositories, our libraries versions couldn't be aligned.
- Updates across multiple repositories: Every 6 months, we would do the same job of updating to the latest Angular release across all our repositories.
- Different coding standards: When projects are spread across multiple repositories, it's almost impossible to ensure that the same coding standards are followed.
Solutions
Angular CLI v6 introduced the concept of workspace. A workspace is the environment in which Angular applications and libraries are developed.
In the context of a workspace, we talk about projects. Libraries and applications are the two kinds of projects that we can have inside a workspace.
In a workspace we can have one or more projects. If we have many projects per workspace, we talk about multi-repo (one Git repository = one Angular project in a workspace). If we have more than one project in a workspace, we're in a monorepo setup (one Git repository = multiples Angular projects in a workspace).
We have migrated to a monorepo approach. Having all our code base in the same repository gives us many benefits:
- Discoverability: We have now a single entry point for our libraries, and developers know where to find it. This encourages contributions from our internal Angular community.
- Unified versioning: All our libraries operate now on a single version which is kept in the workspace's
package.jsonfile. - Single place to update: Every time a new version of Angular is released, we have a single place to update, and we do the job only once.
- Consistent coding standards: All projects within the workspace have the same coding standards by sharing the same TSLint rules and the same TypeScript configuration options.
To create an Angular workspace, you use the ng new command. But I generally use it with the --create-application flag like this:
ng new make-it-awesome-workspace --create-application=false
This tells the Angular CLI not to generate an initial application when creating a workspace. I do this because I find it cleaner to have all my projects under the projects folder when I am in a monorepo setup.
Schematics
We have put together a documentation on how to start new Frontend project at Air France-KLM. It consists of a few steps:
- set up a new Angular project,
- set up Angular Material,
- set up our theming library for Angular Material,
- set up a proxy for local development,
- follow best practices from the Angular Style Guide (module organization for example),
- get the project ready for the Continous Integration server,
- ...
Problems
- Adoption: Having a starter kit in the form of documentation is not attractive for developers. They don't want to go through a series of steps to scaffold the initial structure of their application. That's why a tool like the Angular CLI is awesome. It takes care of many plumbing tasks when starting a new Angular project. But it only gives you a minimal setup. It's up to developers to build up from there.
- Inconsistency of development: Developers would follow only parts of the starter kit and come up with solutions to problems we have already solved.
- Documentation updates: Unfortunately, we cannot run
ng updateon documentation. Therefore, every 6 months, we would need to manually update our starter kit. The process is error-prone and not ideal for developers that are creating a new Angular application while we update our documentation.
Solutions
We have created our custom schematics.
Schematics is a tool that helps the Angular CLI scaffold a new Angular workspace (ng new), generate blueprints (ng generate), update/migrate existing code (ng update), and add frameworks support to an Angular application (ng add). It's all about code generation.
The nice thing about schematics is that it allows us to extend the CLI's scaffolding capabilities.
Workspace Schematic
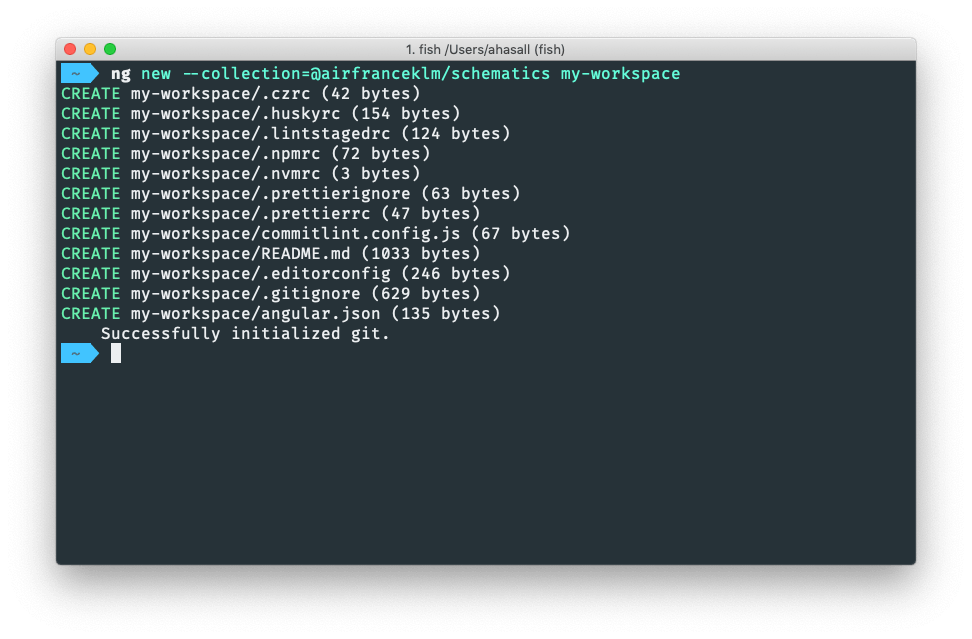
We have extended Angular's default workspace schematic. Our schematic installs new dependencies and adds the following configuration files:
| Files | Package | Purpose |
|---|---|---|
| .npmrc | Configure NPM to points to our internal registry where our libraries are hosted. | |
| .nvmrc | NVM | Specify the version of Node.js the workspace needs. This is used by our CI server to run the right version of Node.js. |
| .huskyrc | Husky | Set up Git hooks easily. For now, we have 3 Git hooks: commit-msg (check if the commit message follows the Angular Conventional Commit), pre-commit (check linting errors and code formatting issues) and pre-push (run our unit testing suites). |
| commitlint.config.js | Commitlint | Verify that commit messages adhere to Angular Commit Conventions. |
| .czrc | Commitizen | Create commit messages that follow the Angular Commit Guidelines so that your commit don't get rejected by Commitlint 😉. |
| .lintstagedrc | Lintstaged | Run linters on Git staged files (we run ng lint and prettier --check on staged files ). |
| .prettierrc | Prettier | Format code automatically. |
You get all this by running a single command:
ng new --collection=@airfranceklm/schematics my-workspace
Application Schematic
Unlike the official Angular schematics, our workspace schematic doesn't generate an initial Angular application. Developers should therefore generate a new application with the following command:
ng generate @airfranceklm/schematics:application
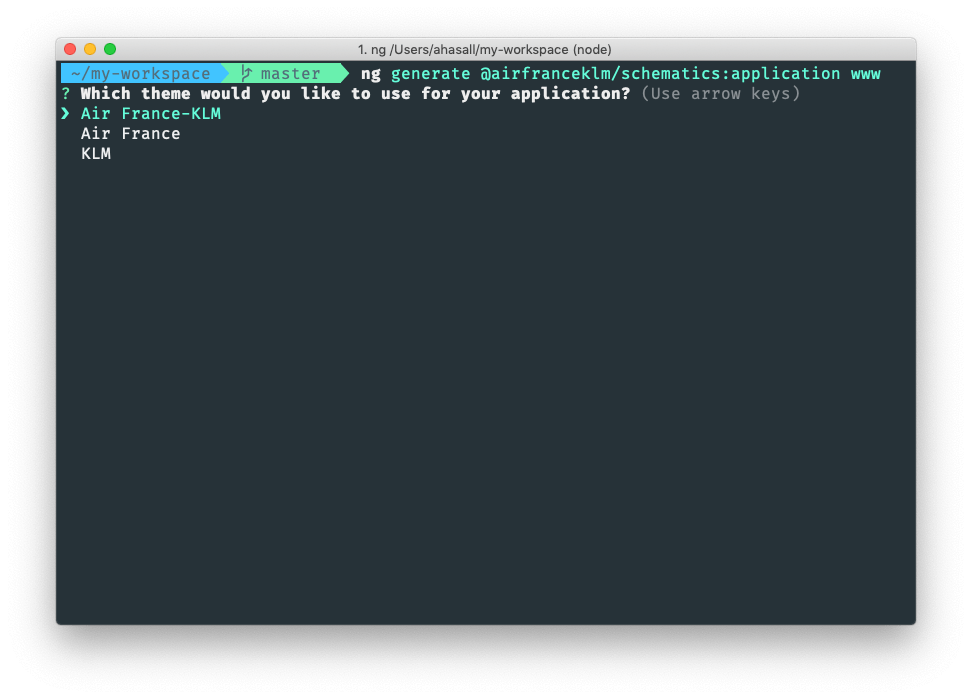
This schematic asks you your brand (Air France, KLM, or Air France-KLM) and setup Angular Material theming accordingly (colors, fonts and typography).
Air France, KLM, and Air France-KLM are three different brands that have their own digital style guide.
Air France and KLM are sister companies that belong to the Air France-KLM Group.
Our application schematic also creates a CoreModule, and a SharedModule as recommended by the official Angular style guide.
Conclusion
Since v6, the Angular CLI has become more generic, more powerful, and more extensible. It gives us all the tools needed to develop high-quality applications. The Angular CLI is what makes Angular not a framework but a platform. It's what makes it easy to develop. For me it's the most important asset of the Angular community. I want to say thank you to the Angular CLI Team, in particular Minko Gechev who helped me land my first contributions to the Angular CLI.
If you enjoyed this article, follow @ahasall on Twitter for more content like this.