
Last updated: 13 June 2022
When starting a new Angular application, the Angular CLI sets up everything you need for unit testing using Karma and Jasmine.
In this article, I will show you how to ditch Karma and Jasmine and use Jest as your unit testing framework and runner.
1. Install the needed dependencies
npm install jest jest-preset-angular @types/jest --save-dev
or if you are using yarn as package manager:
yarn add jest jest-preset-angular @types/jest --dev
Jest
Jest is a full-featured testing framework from Facebook that is very popular in the React ecosystem. It comes with everything needed for unit testing JavaScript applications out of the box like:
- powerful mocking capabilities,
- built-in assertion library,
- built-in code coverage generator,
- JSDOM, a helper library that simulates the browser's DOM allowing you to run your tests in a CI server without extra configuration.
I prefer Jest over Karma and Jasmine because I think Jest provides a better developer experience. Jest is:
- faster than Karma,
- very well documented,
- smarter than Karma by rerunning only affected tests,
- a complete toolkit for unit testing,
- headless by default thanks to JSDOM.
Type definitions for Jest
The @types/jest package contains Jest's type declaration files allowing TypeScript to perform the necessary type checking.
Jest Preset Angular
The jest-preset-angular package is the tool that makes it possible to run our Angular unit tests using Jest. It includes:
ts-jest, a library that allows Jest to transpile our TypeScript code in-memory before running the tests.- Snapshot serializers to enable snapshot testing for our Angular components.
- AST transformers to remove the CSS styles and inline the HTML templates of our components making them usable with JSDOM.
2. Configure Jest
Let's say we've generated an Angular application called my-app with the following command:
ng new my-app
Create the jest.config.js file at the root of your project
const { pathsToModuleNameMapper } = require('ts-jest');
const { compilerOptions } = require('./tsconfig');

module.exports = {
  preset: 'jest-preset-angular',
  roots: ['<rootDir>/src/'],
  testMatch: ['**/+(*.)+(spec).+(ts)'],
  setupFilesAfterEnv: ['<rootDir>/src/test.ts'],
  collectCoverage: true,
  coverageReporters: ['html'],
  coverageDirectory: 'coverage/my-app',
  moduleNameMapper: pathsToModuleNameMapper(compilerOptions.paths || {}, {
    prefix: '<rootDir>/'
  })
};
The jest.config.js holds Jest's configuration. With this configuration, Jest will:
- look for
.spec.tsfiles inside our project'ssrcfolder, - read our TypeScript configuration file
tsconfig.jsonfor any TypeScript aliases to make them understandable by Jest, - compile our TypeScript code in-memory before running the tests,
- collect code coverage information and write them down in a folder called
coverage/my-app.
Update the content of the src/test.ts file
Replace the content of the src/test.ts with the following:
import 'jest-preset-angular/setup-jest';

Object.defineProperty(window, 'CSS', {value: null});
Object.defineProperty(window, 'getComputedStyle', {
  value: () => {
    return {
      display: 'none',
      appearance: ['-webkit-appearance']
    };
  }
});

Object.defineProperty(document, 'doctype', {
  value: '<!DOCTYPE html>'
});
Object.defineProperty(document.body.style, 'transform', {
  value: () => {
    return {
      enumerable: true,
      configurable: true
    };
  }
});
This code does two things:
- Import the
jest-preset-angularJavaScript module to set up our Angular testing environment. - Mock some properties and functions of the global
windowobject to make sure our tests can run in a JSDOM environment.
Update the content of the tsconfig.spec.json file
{
  "extends": "./tsconfig.json",
  "compilerOptions": {
    "outDir": "./out-tsc/spec",
    "types": [
      "jest" // 1
    ],
    "esModuleInterop": true, // 2
    "emitDecoratorMetadata": true // 3
  },
  "files": [
    "src/test.ts",
    "src/polyfills.ts"
  ],
  "include": [
    "src/**/*.spec.ts",
    "src/**/*.d.ts"
  ]
}
- Register Jest's type definitions files with the TypeScript compiler.
- Enable the
esModuleInteropoption of the TypeScript compiler otherwise Jest will output a lot of warnings in the console. - Enable the
emitDecoratorMetadataoption of the TypeScript compiler otherwise Angular's Dependency Injection won't work with Jest.
Remove the comments inside the TypeScript configuration files
Open the tsconfig.json and tsconfig.spec.json TypeScript configuration files and remove the comments on the first line. These comments were generated by Angular CLI, but they break Jest because comments are not supported in JSON files. If you don't remove these comments, you will have the following error:
Unexpected token / in JSON at position 0
Run the tests
We can now run our unit tests using the following command from the root of our project:
npx jest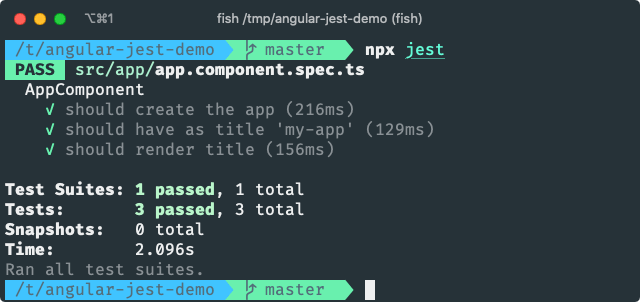
3. Remove Karma
Now that we've successfully set up Jest we can remove Karma.
Remove dependencies
npm uninstall karma karma-chrome-launcher karma-coverage karma-jasmine karma-jasmine-html-reporter
or if you are using yarn as package manager:
yarn remove karma karma-chrome-launcher karma-coverage-istanbul-reporter karma-jasmine karma-jasmine-html-reporter
Remove the Karma configuration file
rm karma.conf.js
Remove the test target inside the angular.json file
Instead of ng test we will now run npx jest to launch our unit tests. Therefore the test target inside the angular.json file is useless. You can remove the section projects.my-app.architect.test from your angular.json file:
"test": {
  "builder": "@angular-devkit/build-angular:karma",
  "options": {
    "main": "src/test.ts",
    "polyfills": "src/polyfills.ts",
    "tsConfig": "tsconfig.spec.json",
    "karmaConfig": "karma.conf.js",
    "assets": [
      "src/favicon.ico",
      "src/assets"
    ],
    "styles": [
      "src/styles.css"
    ],
    "scripts": []
  }
}
Summary
In this article, we saw how we can set up Jest for our unit tests. This can be certainly automated using Angular schematics, but it's not that hard to do it manually.
You can for example add Jest to your Angular project by using Briebug's Jest schematic by running the following command:
ng add @briebug/jest-schematic
The full source code for this article can be found in this Github repository.
If you enjoyed this article, follow @ahasall on Twitter for more content like this.